Monday, July 29, 2013

Ellagee - Get Away From Her, You B*#@€!

The third and final polish that Laura of ellagee sent me to review is finally swatched! I had broken a nail on my swatching hand and had to patch it. Can you tell which?

Anyway, this and all other ellagee polishes can be purchased at:
http://www.ellagee.com

Today, I bring you Get Away from Her, You B----!


As described on the site:

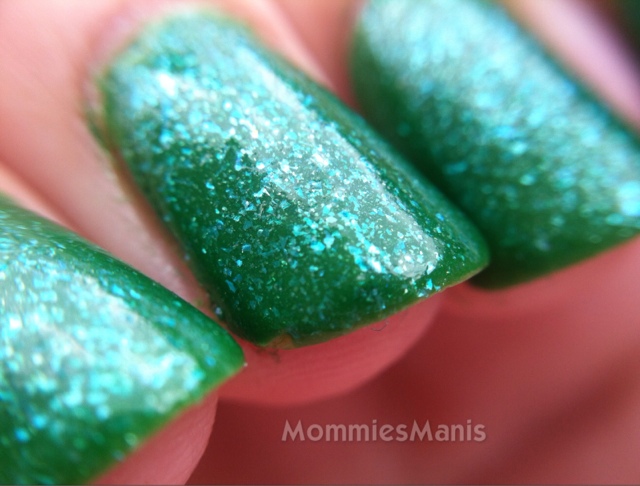
Get Away From Her, You B----! is a green jelly base glow in the dark with a lighter green glass fleck shimmer. Inspired by the colors of the Alien movie poster and named for Ripley's fight with the queen alien in the final scene of Aliens.


I will be upfront, my glow in the dark photos suck. I don't know if my camera just didn't like trying to pick up the green or what, but I PROMISE YOU, this polish glows. In fact, I fell asleep waiting for it to fade, and it glowed at least 20 minutes.


Like the others, the base is fabulous and needed no shaking or anything. It went on like a dream. It dried super fast, which was impressive, because I put three coats over two coats Greenwich Village by OPI.

I left it without topcoat because I liked the semi-gloss finish. It looks so quirky and made me think of mermaid fins!


It glows green. I am so disappointed in my photographs!


It was definitely my favorite of the trio!

Be sure to head to ellagee.com and check out all of the beautiful polishes that are offered!

Thanks again, Laura, for choosing me to review. 


Thursday, July 25, 2013

Ellagee - Redshirt

Today, I will share with you the second if the three mini polishes that Laura if Ellagee so kindly sent me for review.

All of the ellagee polishes can be purchased at-
http://www.ellagee.com

Let me introduce you to Redshirt.


As described on the website:

Redshirt is a clear base with small red, black, and gold hex glitters. Inspired by those unfortunate souls in the red shirts on the crew of the Enterprise.

I decided to layer one coat of ellagee -Redshirt  over two coats Zoya - Mira. I don't know what inspired me to do the fun red and purple combo, but afterward, I imagined it was a great look for the Red Hat Society ladies. Haha. That said, I really like it!


I had issues being selective with photos, so... You get to see almost all of them that I took today.

This glitter polish went on awesomely. I only needed one quick coat and it had very even and glitter-loaded coverage. It dried quickly and pretty smooth considering the load of glitter on the nail. I did give it a top coat for added gloss.

Oh yeah, and as I mentioned yesterday, the base she uses is thick and it required no shaking or swirling at all! I LOVE that.


I have no complaints on this polish. I think I would like to wear it over a cobalt blue or black also! 

Wednesday, July 24, 2013

Beam Me Up - Ellagee

The super kind Laura of Ellagee Polish recently sent me three samples from her new Sci-Fi Geeks collection to review!

You can get her polishes at:
http://www.ellagee.com

First up for review is "Beam Me Up."


As described on her website:

Beam Me Up is a sheer gold shimmer topcoat. Inspired by Star Trek transporter effect.


This polish goes on very smoothly. It also seemed to dry really quick. But, when she says it is sheer, she isn't kidding. In most of the photos (the not-macro ones) it's kind of hard to tell I am wearing it!


I started with a base coat of two layers Sinful Colors - Ablaze on all nails except my ring finger, which was one (yes, ONE) coat of Sinful Colors - My Buoyfriend.


On my thumb nail, I did one coat Beam Me Up. On my pointer finger, I used two. On my middle and ring fingers, I did a diagonal stripe of two coats Beam Me Up at the tips, and on my pinky nail, three costs Beam Me Up.


I like the shimmer, and it is really pretty in person, up close, but if you are looking for something with a very noticeable effect, you may be disappointed. I know that I prefer polishes that are more noticeable, but that's just me. It's still very pretty. It shows best on the macro photos.


Oh, and I just have to say that I LOVE the suspension base for these polishes. It's the thicker, dreamy stuff that really requires no shaking. Excellence, for sure.


Friday, July 19, 2013

Mint Manis for Talia Joy

On Tuesday, July 16th, 2013, thirteen year old Talia Joy Castellano lost her battle with cancer. She was a beautiful and inspiring young lady and she exhibited a strength and wisdom beyond her years. She also loved all things makeup and nail polish, posting videos on YouTube as TaliaJoy18. I didn't know Talia personally, but like so many others, my heart was touched by her optimistic attitude in her videos and interview on Ellen. My heart aches for Talia's family and friends, but they are determined to keep Talia's memory alive and reach the goals that she was unable to meet during her short time on Earth.

Today, bloggers and social media users are wearing mint colored manicures in honor of Talia, as that was one of the last photos she posted...she & her mother with matching mint green nails. Nik & I wanted to join in, so here are our #mintmanisfortaliajoy to keep #TaliasLegacy alive!

Desi: I lost a childhood friend to cancer the day after my 11th birthday. Gillian was almost 12 when she died. Our friendship was really just beginning when she got sick. It was very difficult to have to say a final goodbye to someone so young. Every time I watched Talia's videos, I thought of Gillian, so I'm wearing my Sally Hansen Xtreme Wear in Mint Sorbet for both of them today. <3
(I used iPhone apps A Beautiful Mess and Fontgram to edit this photo.)


Nik: While I am a little embarrassed to admit I really didn't know details about Talia until last night, I thought I would join in to honor the life she lived, battle she fought, and legacy she left in the world. 

For my manicure, I used a base cost of Sinful Colors - Mint Apple and then taped my nails to give the tips a coat of Wonder Beauty Products - Aphrodisiac. I love these two together, though its the first time I have used them as a combo.

If you want to share your Mint Manis for Talia Joy on our Facebook page, you can send us a message there (Facebook.com/MommiesManis) and we can upload them to the community mani album, or you can send us an email at mommiesmanis@gmail.com. Or, just upload them directly to our page!

Wednesday, July 17, 2013

Quick Manicure with Accent Nail

 photo null_zps90501225.jpg

Hello everyone! I'm Angela from Icing On The Face where I blog about all things beauty. I share product reviews and comparisons, favorites, tips and tricks, nailseverything. I know that Nik and Desirae have had quite a busy summer and because of that I want to share my favorite quick but fun nail look. This is something I love to do when I want an eye-catching and cute nail look but don't want to spend a lot of time on nail art or applying glitter meticulously. No sitting down and taking 20 minutes to think up a design and then an hour to execute (if you've ever done nail art then you already know what a time-eater it truly is).
Sally Hansen's Salon Effects Real Nail Polish Strips are really quick and easy to apply and have great lasting abilities. Okay, call me a cheater when it comes to nail art; I'll take it. They're fool-proof and there's no drying time! I don't always have the time or patience, does that mean I have to forfeit the cute designs? Just let me cheat, alright?
 photo null_zpsa55a5600.jpg

Whenever I use any nail polish strips I always save what is left for a rainy day (they all come with extras). Just make sure you put them in a ziplock bag so that they will not dry out. When I'm in a hurry, I just add my leftover nail strips to one nail and paint the rest a pretty color. For this look, I chose Essie's First Timer which I am loving for summer and as a contrast to the black and white of the Tri-bal It On nail strip by Sally Hansen. If you want more tips for making the leftovers really work, check out my post Making Sally Hansen Salon Effects Real Nail Polish Strips Go Farther.

Please share if you recreate this! Hope you enjoyed!

 photo ad0ccbf8-28fa-46fb-a9ef-482114034b01_zpsabdf7f0f.jpg